1 GitHub for Project Management: Many Options!
In addition to version control and collaboration, GitHub provides a suite of tools to help you manage your projects. These tools can be used in combination to track tasks, document decisions, and communicate with your team. Here we’ll focus on three strategies for project management within GitHub, from easy to complex:
- GitHub Issues: a way to identify, delegate, and document specific, actionable tasks within a repository
- GitHub Issues + Sub-issues: a way to track dependencies among tasks and break larger tasks into smaller, more manageable pieces
- GitHub Projects: a way to organize, track, and communicate issues, sub-issues, tasks, and collaborators within a larger collaboration
2 GitHub Issues
GitHub Issues are a way of identifying, delegating, and documenting tasks within a single repository, or even across repositories. Think of them as a structured, searchable to-do list that lives right next to your code - complete with a comment thread, assignees, labels, and a permanent record even after a task is finished.
They can also serve as a digital lab notebook: a place to brainstorm, preserve important links, or distribute supplementary material across a team.
An additional use (common in open-source projects) is letting people outside your team flag problems or request features. If you’ve ever filed a bug report on an R package hosted on GitHub, you’ve already opened an issue.
Issues are helpful, but they are not required to use GitHub for collaboration. They shine most when a team needs to divide labor across multiple tasks, or when you want a persistent record of questions and decisions that have come up during a project.
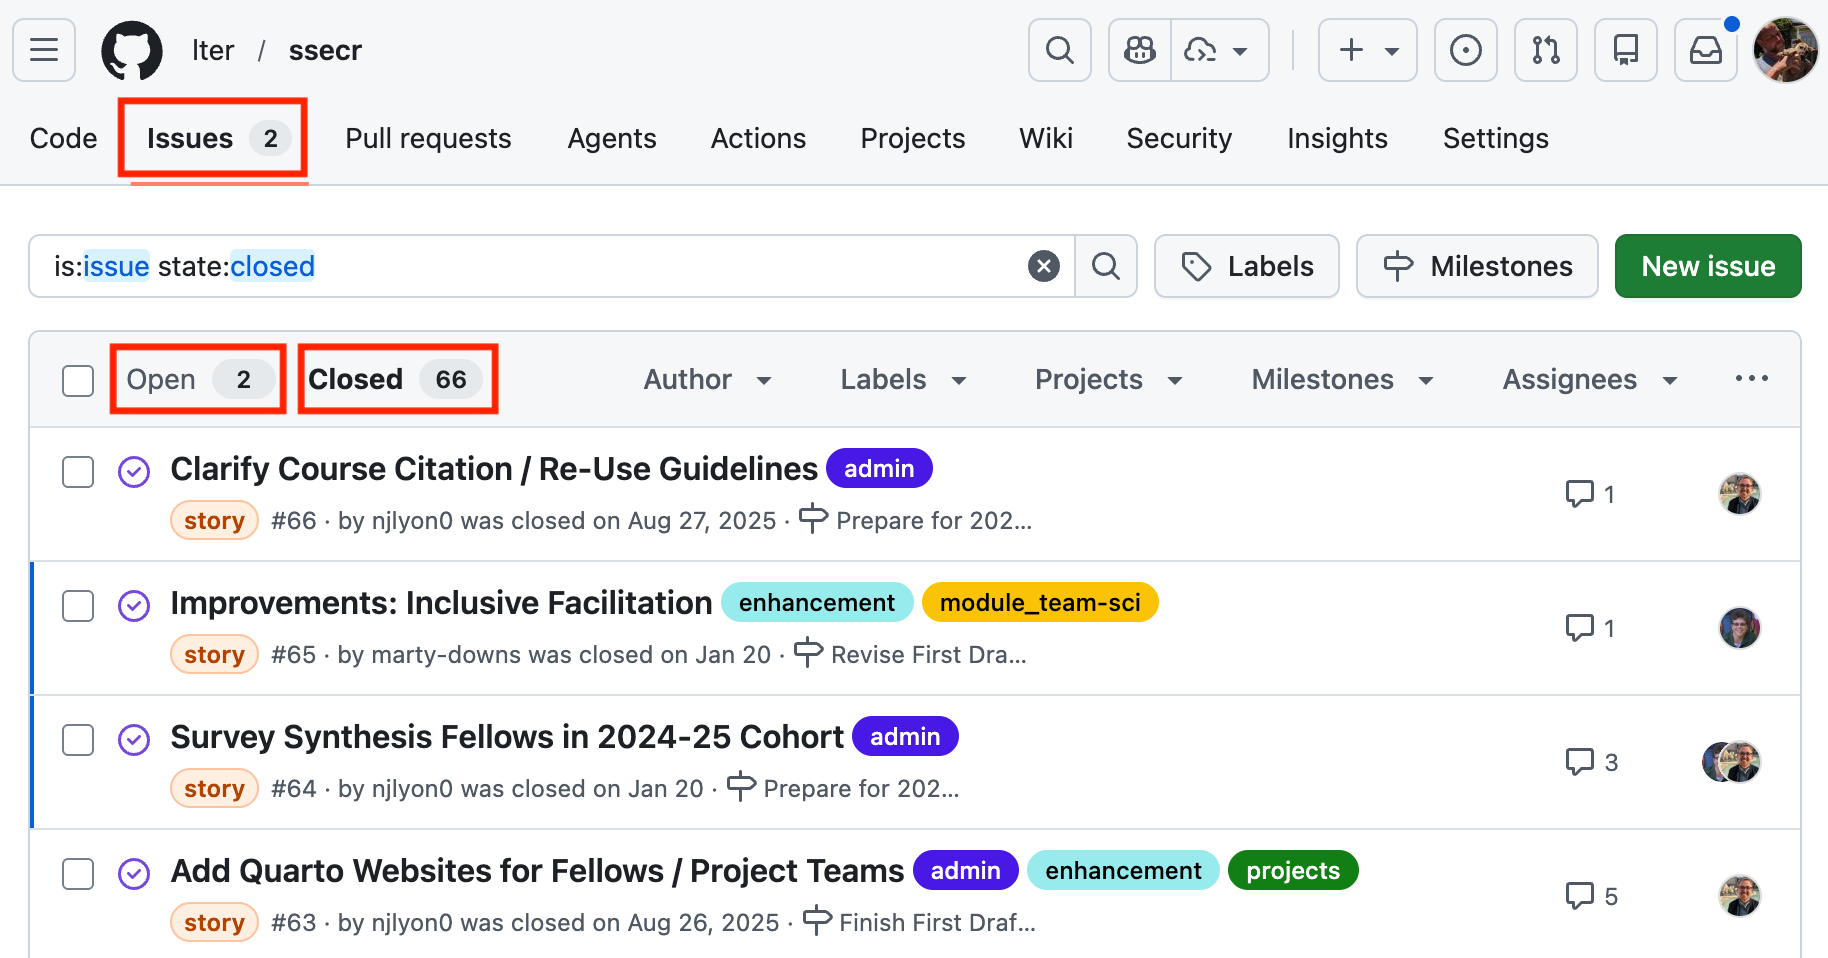
- Open issues are active tasks (shown by default).
- Closed issues are finished tasks - still fully searchable, but filtered out of the default view.
If a repository has no issues at all, the Issues tab will still be present but empty.
2.1 Creating an Issue
For this set of exercises, choose a partner with whom you’ve already collaborated on a GitHub repository. If you haven’t yet collaborated on a repo, have one partner create a new repository and add the other as a collaborator (Settings Collaborators Manage Access Invite a collaborator).
Both the repo owner and collaborator should navigate to the repository’s Issues tab and follow along with the steps below, in parallel. For inspiration for writing your issue, consider a higher-level task for a project you are currently working on, or for our examples, we’ll use a hypothetical project involving salmon data.
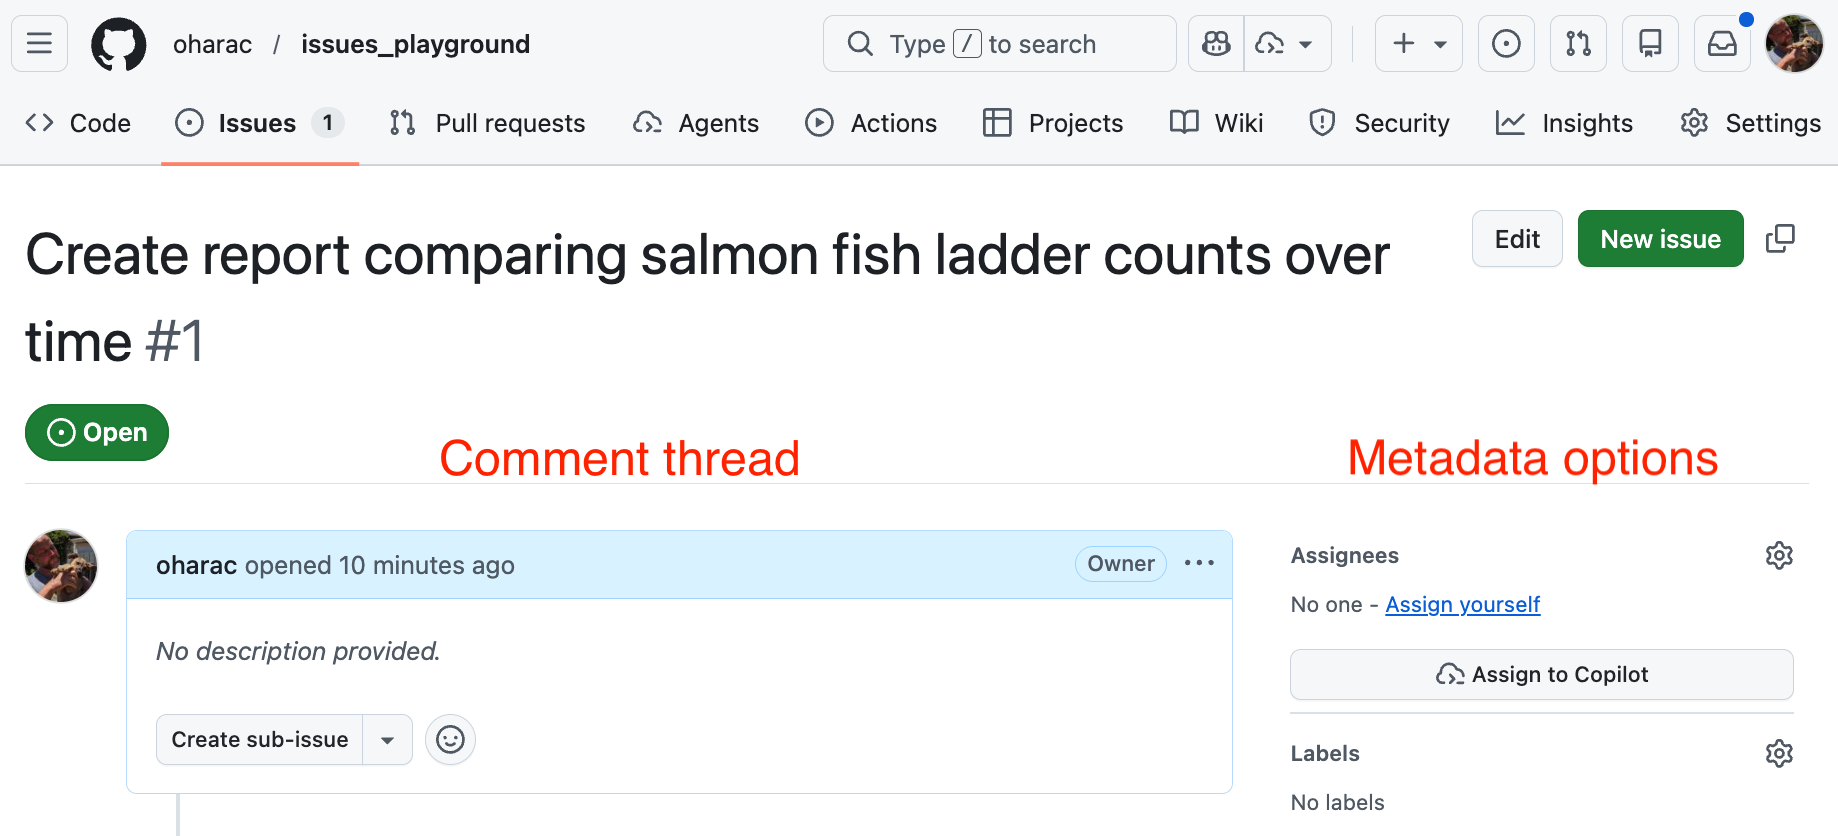
- Click New issue
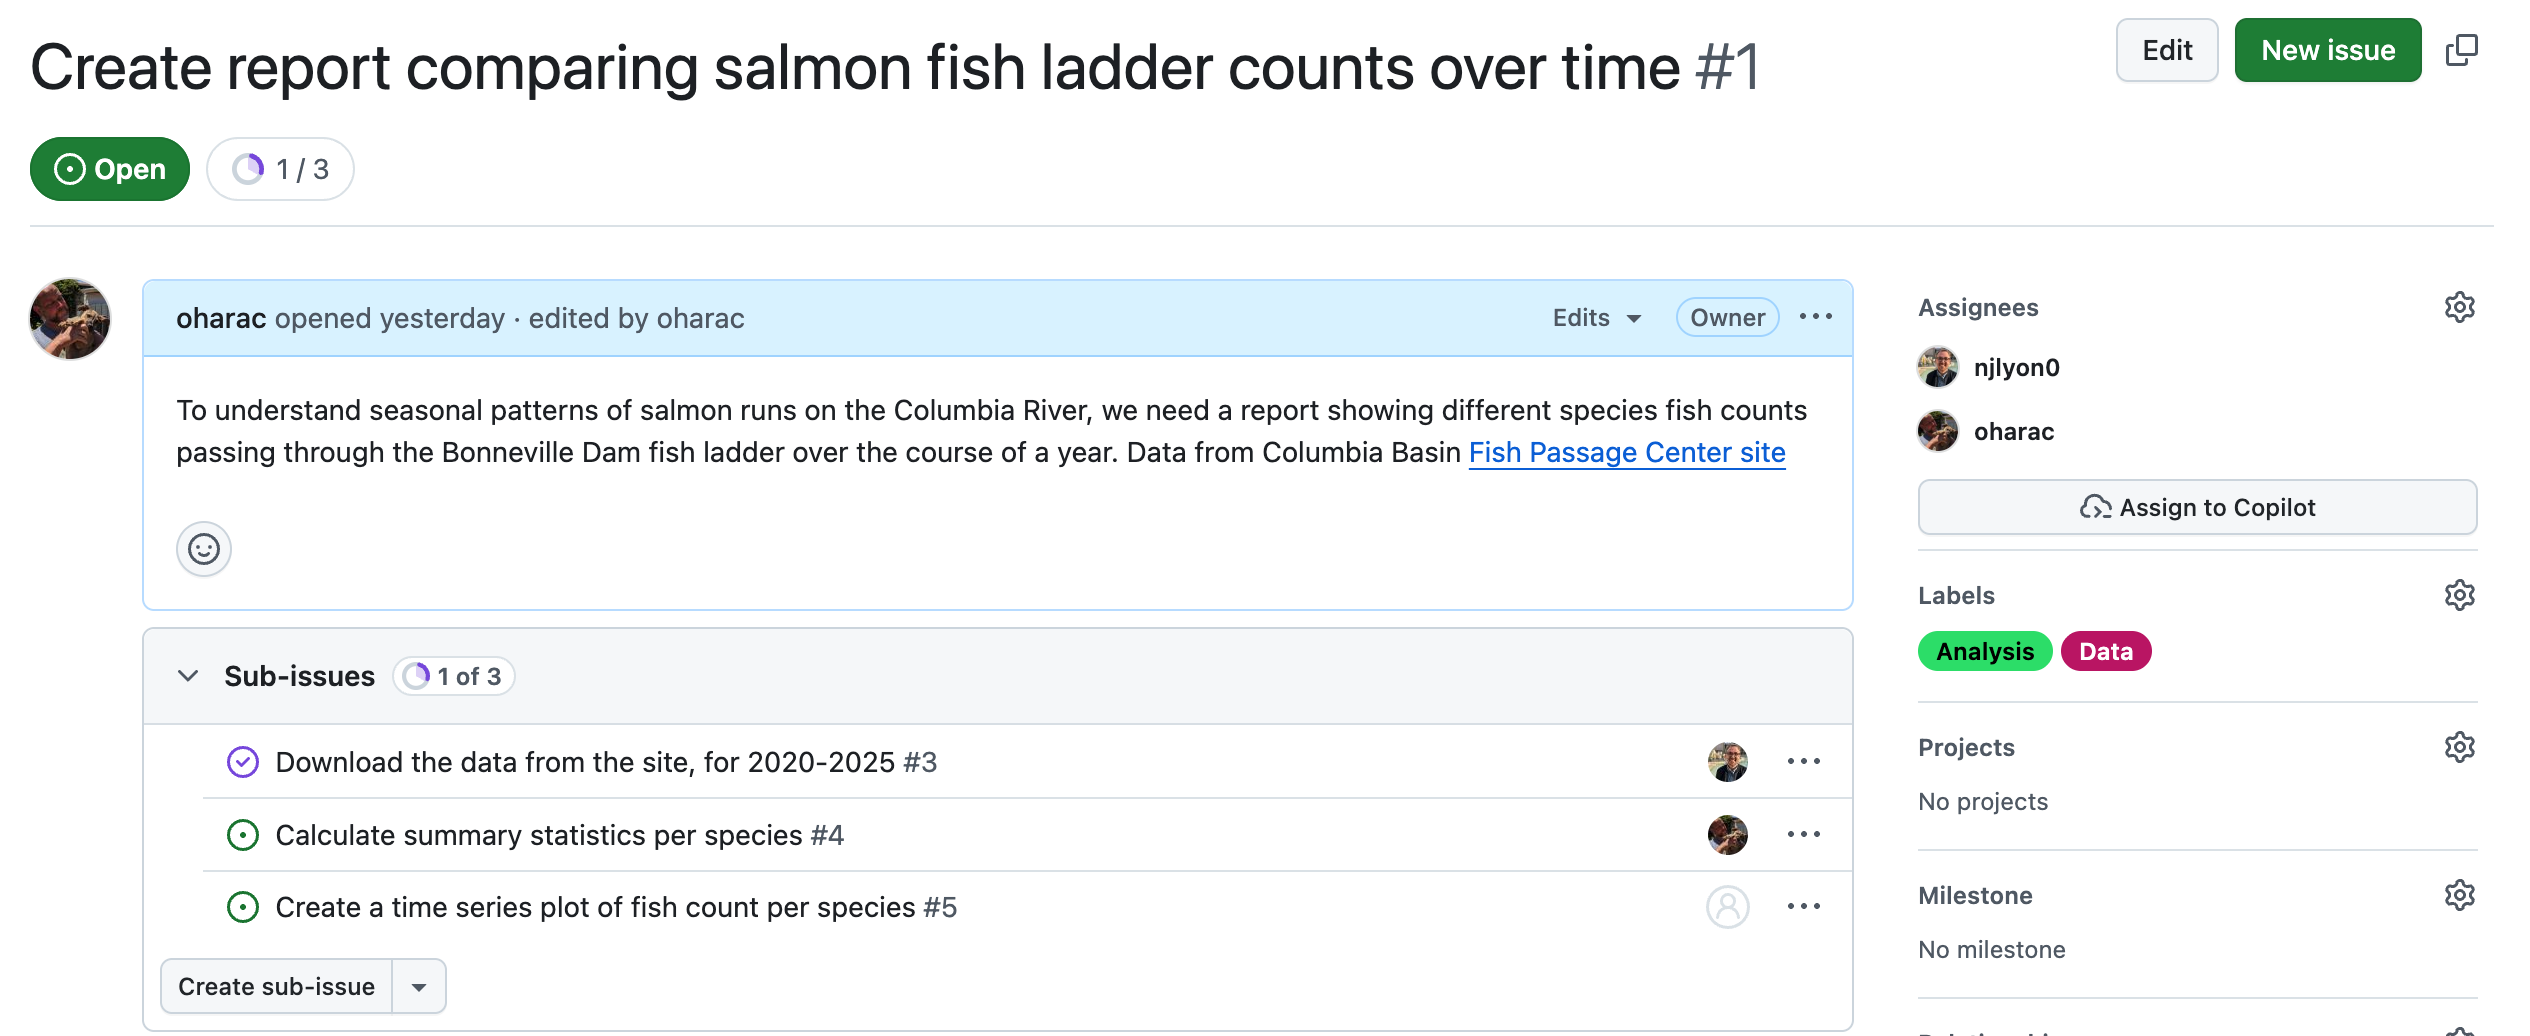
- Type a title (e.g., “Create report comparing salmon fish ladder counts over time”)
- Leave the “add a description” section blank (for now - normally you’d fill this in too)
- Click Create
Congrats - your first issue! GitHub assigns it a unique number that is permanent and repository-specific - we’ll come back to this later.
You’ll be redirected to the issue’s own page. It has two main areas:
- Left column (wide): The comment thread - the narrative of the task
- Right sidebar (narrow): Metadata options - tools to categorize the task
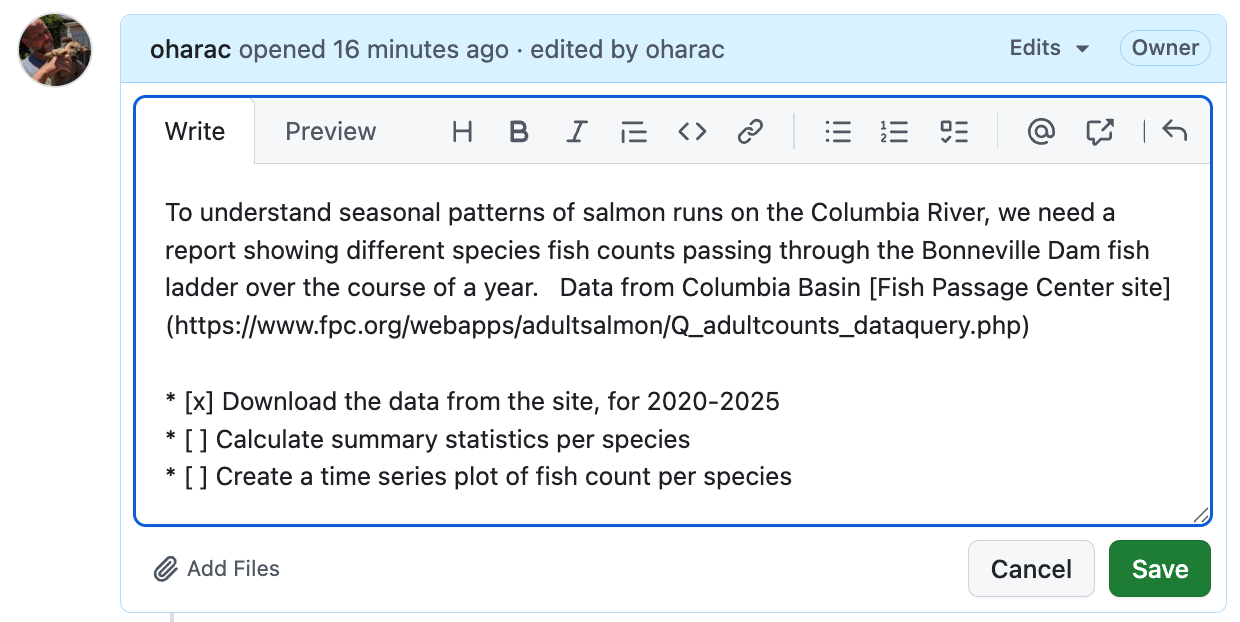
To edit your issue after the fact, click the ellipsis (…) in the top-right corner of that comment and choose Edit. Add content to the description field appropriate for your issue.
Useful things to include:
- Why this task needs to happen (not just what)
- Any relevant links, file paths, or prior decisions
- A checklist or bulleted list of sub-steps if the task has a predictable structure
GitHub issues accept Markdown, so headers, bold text, checklists (- [ ] item), and code blocks all work here.

Your most frequent collaborator is you, a few days, weeks, months from now. Write enough context that a future team member - or a future you - can understand the task without needing to reconstruct the conversation from scratch.
Metadata, or information about the issue, provides additional details to help filter, categorize, and track the progress of the issue.
- Assignees: Tags responsible people; they get email notifications for all activity.
- Labels: Adds categorical tags (e.g.,
bug,enhancement,data) to your issue to help search and filter. Fully customizable. - Other metadata options include Projects (which we’ll cover later), Milestones (for grouping issues by a common deadline or goal), and Relationships (for managing dependencies among issues).
Add an Assignee: Click on “Assignees” and add yourself and/or a collaborator. You can only add people who have collaboration permissions or who have contributed to the repository.
Customize Labels: The built-in labels might not make as much sense for data analysis. Click the gear icon next to “Labels” in the sidebar, and scroll down to the bottom to find “Edit Labels”.
- Add two new labels: “Data” and “Analysis” (or whatever makes sense for your project!). Choose a color for each and add a brief description.
- Delete other labels if you prefer.
Assign a Label: Assign one or more appropriate labels to your issue.
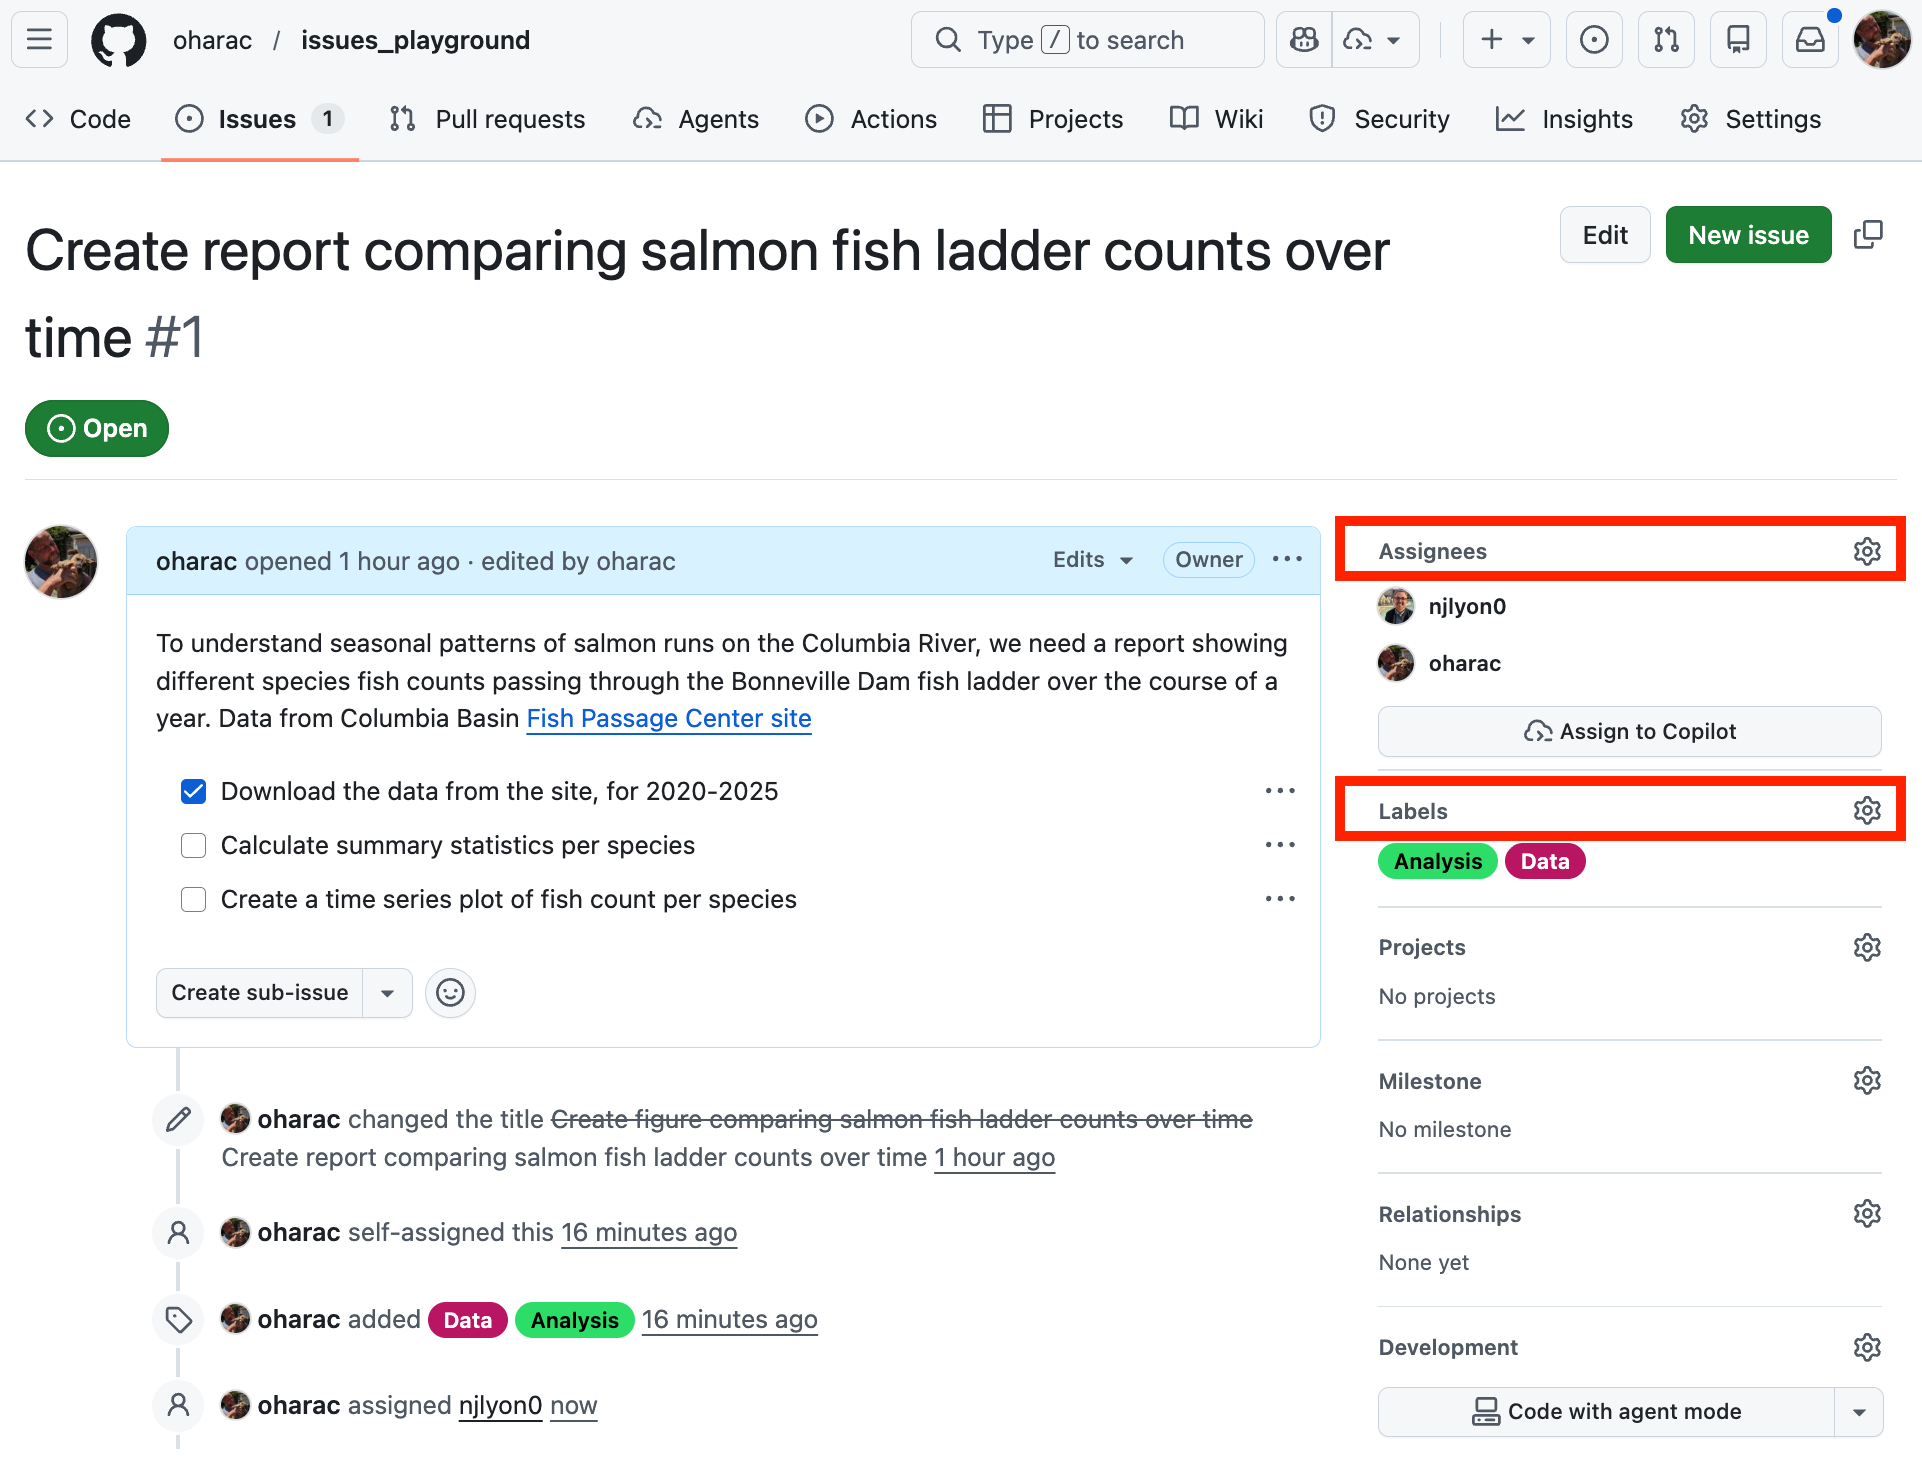
As you add assignees and metadata, GitHub tracks these changes in the issue’s comment thread! This gives you a permanent record of when and how the issue was categorized and who is responsible for it.
2.2 Issues as a Communication Tool
The comment thread of an issue can be used to document the progress of a task, and to have discussions about how to approach it. This is especially helpful for asynchronous communication across time zones or schedules.
You and collaborators can respond directly on GitHub, including changing labels, adding links, checking off checkboxes, and updating assignees.
If you write an issue or are an assignee, or you have set your status to “watching” the repository, you will also get email notifications for all activity on that issue. You can open the issue in GitHub from your email, or better yet, respond directly from your inbox just like a regular email. This is helpful for managers and non-coders who want to stay in the loop without needing to log into GitHub.
On collaborative projects, discuss with your team how to best use the various communication tools at your disposal - GitHub Issues, email, Slack, etc.
- GitHub Issues are well suited for tracking specific, actionable tasks and decisions that you want to be permanently documented and searchable.
- Slack may be better for quick questions and back-and-forth conversations that don’t need to be preserved.
- Email may be best for communicating with people outside your team or organization who may not have access to GitHub or Slack.
2.3 Closing an Issue
When all questions and tasks connected to a specific issue have been answered and resolved, you can close the issue to remove it from the “open” issues list. Click the Close issue button at the bottom; best practice is to include an optional final comment explaining the reasons for closure.
All documentation is preserved in the closed issue, and you can always reopen it if needed.
3 GitHub Issues with Sub-Issues and Dependencies
GitHub has features to link issues together to track dependencies (e.g., issue A needs to be complete before issue B can start) and nest sub-issues within larger issues (e.g., issues C and D are sub-tasks required to complete issue A).
3.1 Reference by Issue Number, Three Ways
The quickest way to communicate a connection between two issues is simply to reference one issue in the text of another. Each issue is assigned a unique number that is permanent and repository-specific. You can reference this issue number in other issues, commit messages, and pull requests to easily create links between them, even across multiple repositories!
To reference an existing issue from an issue or comment thread, simply type # followed by the issue number (e.g., #2 - that’s it!). This creates a link to the referenced issue, and on that issue, creates a back-reference in the comment thread.
To reference an issue from a commit message, use the same syntax (# followed by the issue number). If you include keywords like “fixes” or “closes” before the reference (e.g., “fixes #2”), GitHub will automatically close the referenced issue when that commit is merged into the default branch!
The #-plus-issue-number syntax works for issues within the current repository. To reference an issue from another repository, you just need to provide info on the repo owner and name where the referenced issue lives: use the syntax owner/repo#issue_number (e.g., oharac/salmon_report#2).
3.2 Sub-Issues, Three Ways
Sub-issues can be used to break down a larger task into smaller, more manageable pieces, each with its own assignees, metadata, and comment thread. A sub-issue is simply a regular issue that is linked to a parent issue (and a parent issue is simply a regular issue that has sub-issues!). A sub-issue can have only one parent issue, but a parent can have many sub-issues.
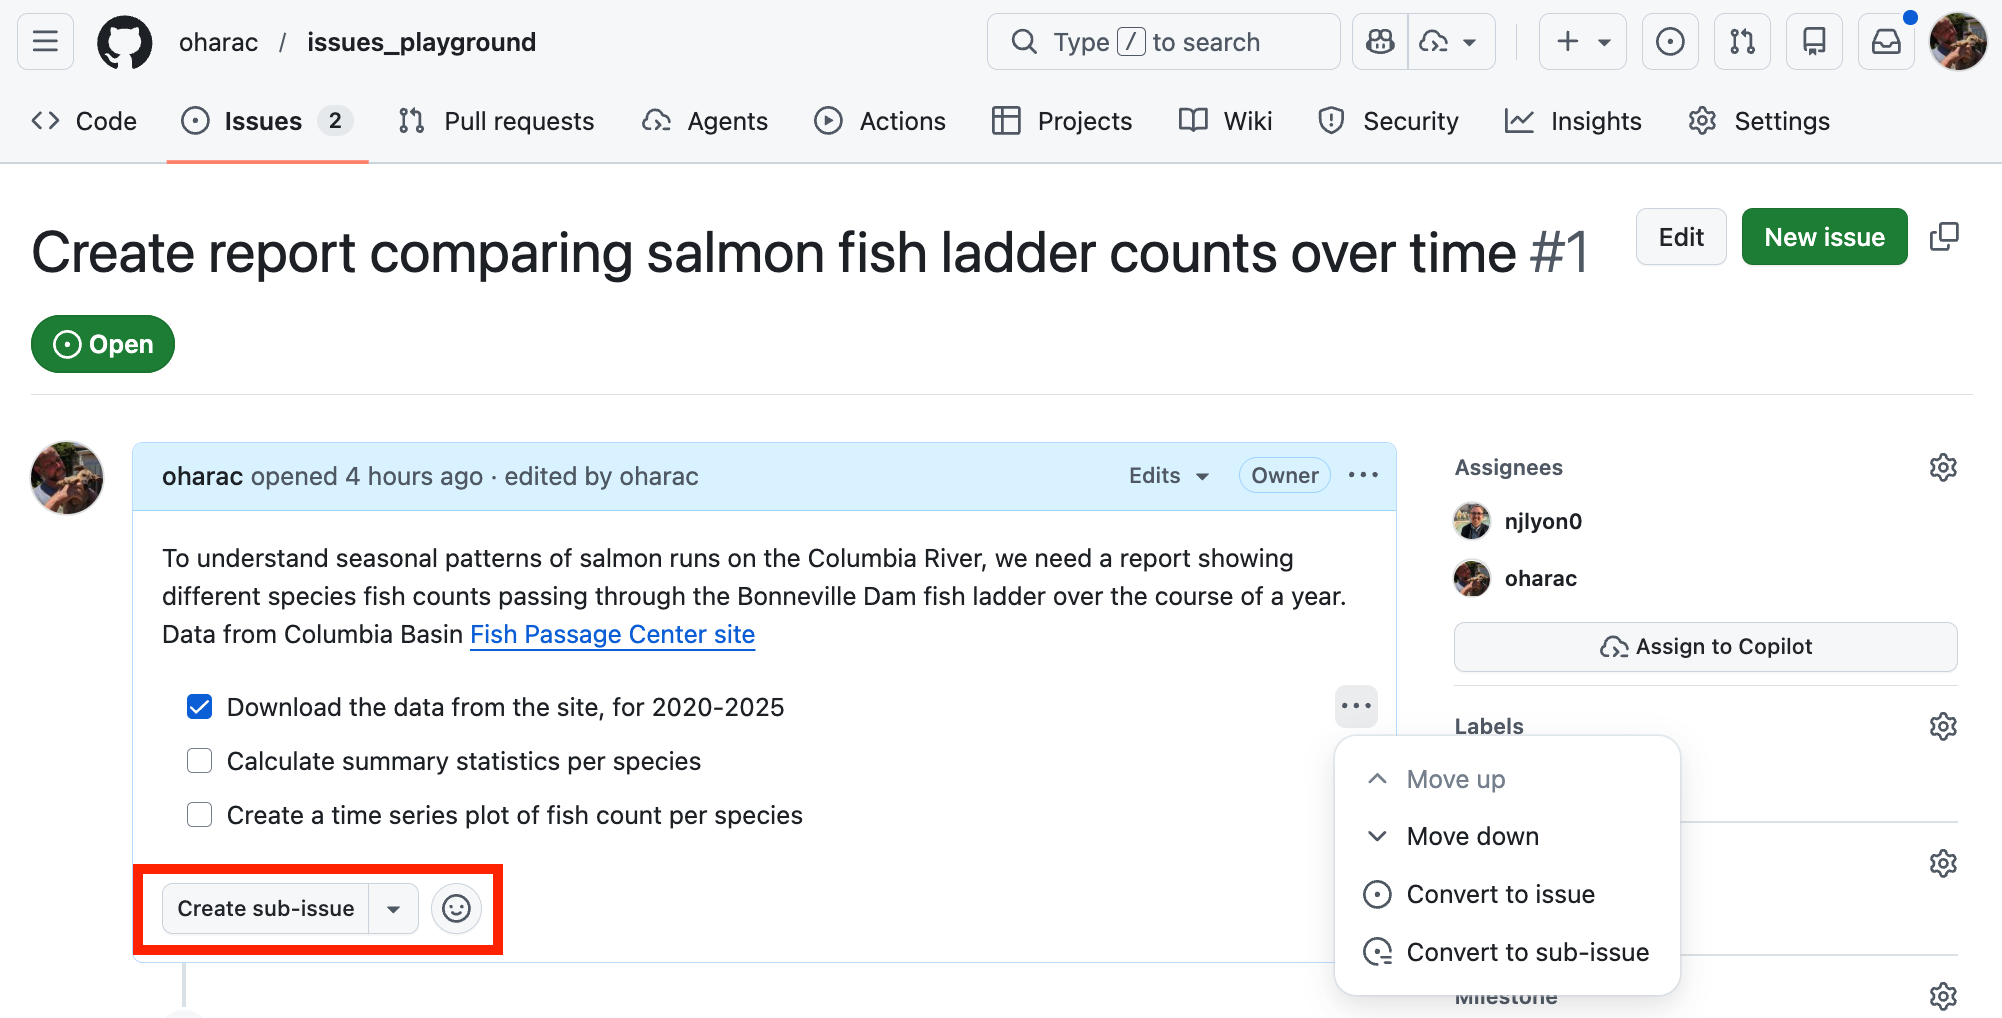
From the top level of the issue description, you can click on the Create sub-issue button to create a new issue that is automatically linked as a sub-issue to the parent issue.
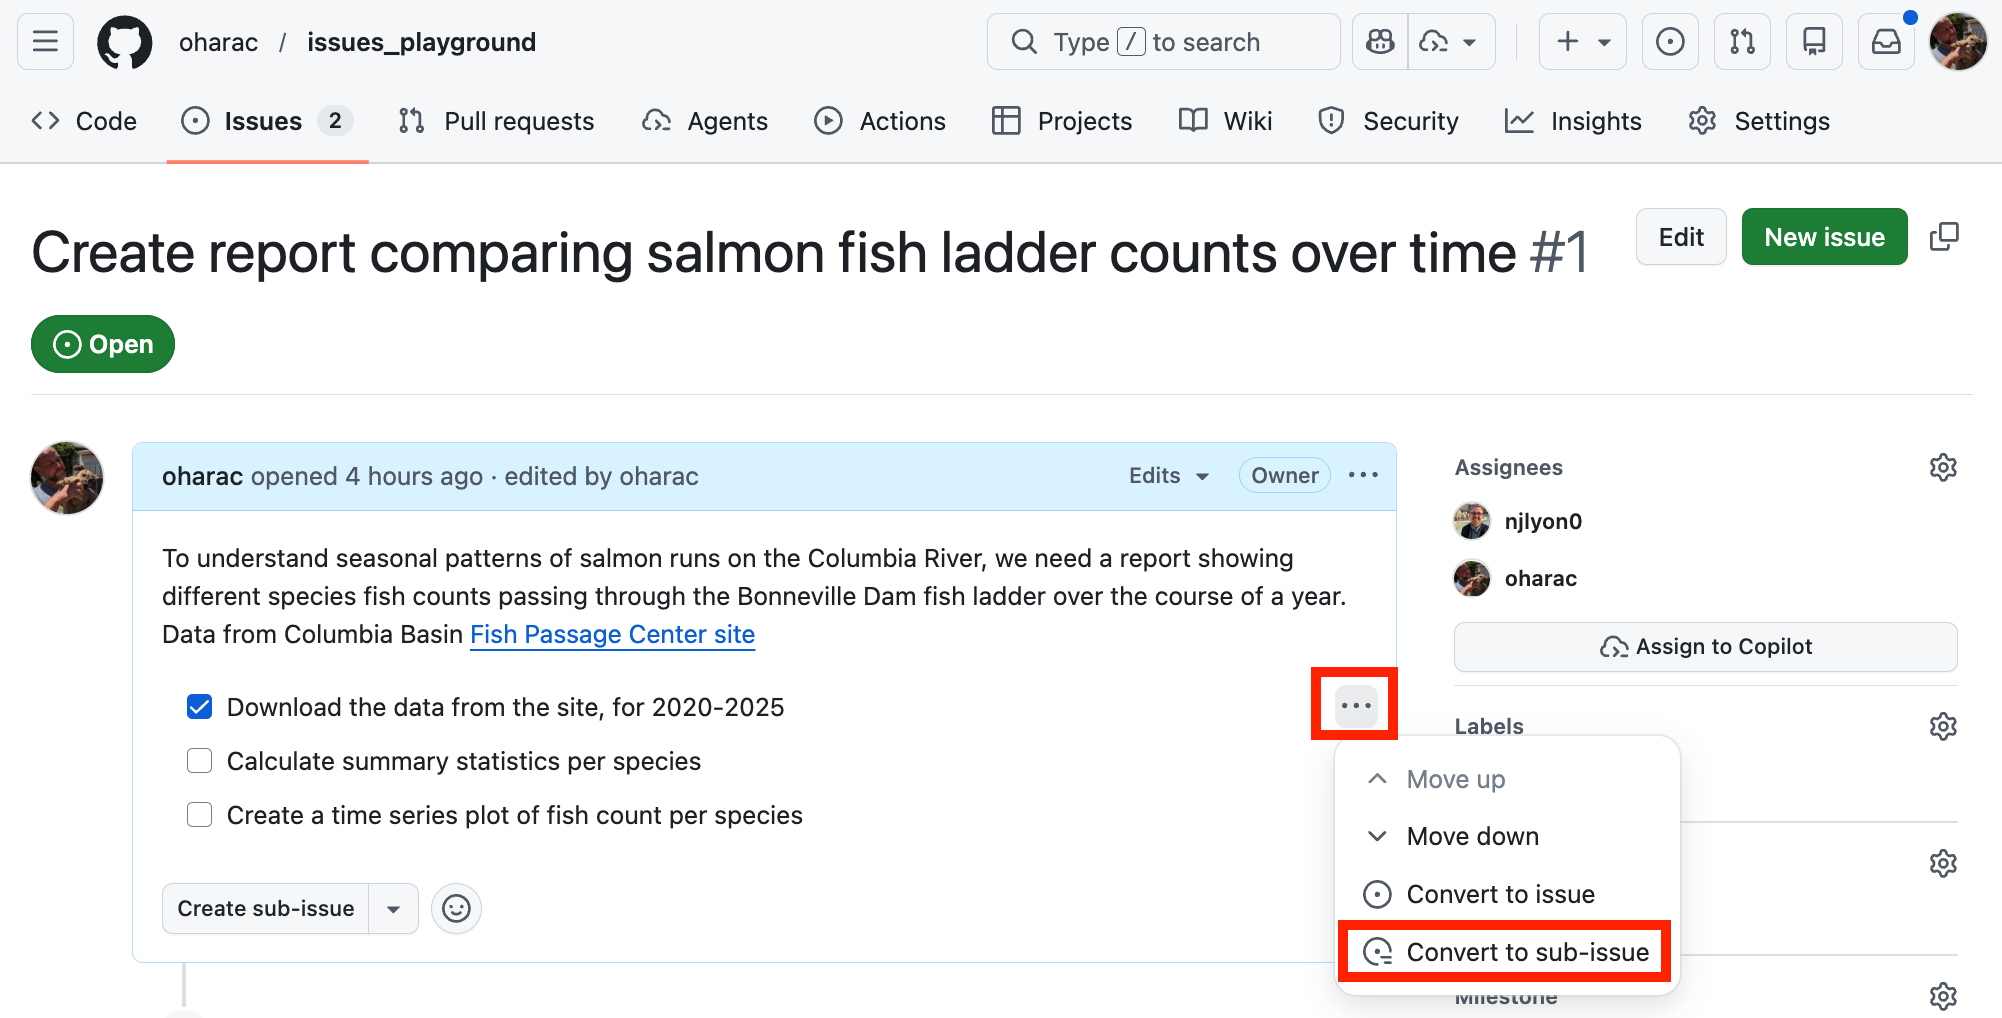
If you have a checklist in the issue description, you can click on the ellipsis (…) next to an item, and choose “Convert to issue” to create a new issue for that checklist item. The checklist item will automatically become a link to that sub-issue!
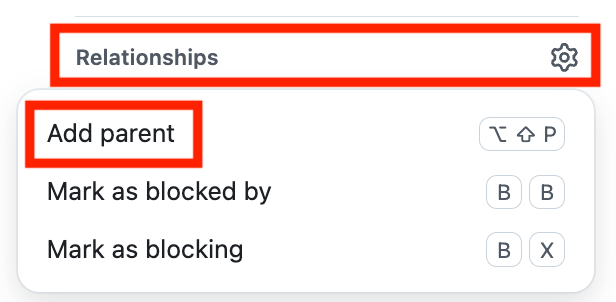
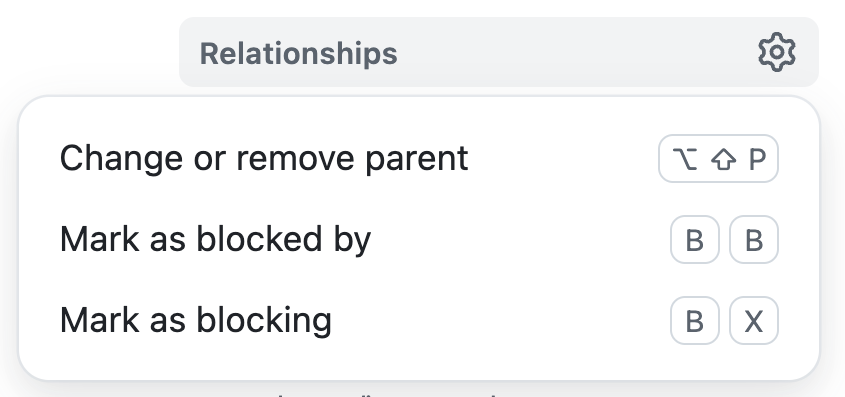
Click the Relationships button at the bottom of the right-hand metadata sidebar, and choose “Add Parent” - it will display a searchable list of potential parent issues from which you can choose.
3.3 Blocking Relationships
A “blocking” relationship between two issues indicates that one issue (the “blocked” issue) cannot be completed until another issue (the “blocking” issue) is complete. To set this up, click the Relationships button at the bottom of the metadata sidebar (same as for “Add Parent”), and choose “Mark as blocked by” or “Mark as blocking” - you’ll see a searchable list of potential blocking or blocked issues from which you can choose. One issue can block or be blocked by multiple other issues.
Using your newly created issue, create at least two sub-issues using any of the three methods described above. Add assignees and metadata as you see fit.
Explore the parent issue and the sub-issues and identify five ways they are linked together.
3.4 Issue Scope
“Issue Scope” describes the size and complexity of a task that is represented by an issue. The scope of an issue can vary from small, specific tasks (e.g., “Fix typo in README”) to large, complex projects (e.g., “Create a report comparing salmon fish ladder counts over time”).
A good approach is to make sure every issue corresponds to a small, independent, measurable task or decision (see SMART Goals). If an issue is too large or complex, it can be difficult to manage and may lead to confusion about what needs to be done. It is not always possible to predict how projects can evolve at the outset, so you may start with issues that end up spanning multiple tasks. As the project progresses, you can edit issues to be more focused, and add sub-issues to break them into smaller pieces, making delegation and tracking of task completion that much easier.
SMART is a popular mnemonic to remember criteria for effective goal-setting:
- Specific: a clearly focused task or decision to be completed
- Measurable: a clear metric or indicator to determine when the task is complete
- Attainable: a realistic task that can be completed by the assignee(s) within the time frame
- Relevant: a clear connection to the overall project
- Time-specific: a clear deadline or time frame for completion
As you write an issue or break a large task into sub-issues, keep these criteria in mind to ensure your issues have a well defined scope!
4 GitHub Projects for Project Management
Projects are GitHub’s primary strategic project management tool. While GitHub Issues can be very useful for particular tasks at a tactical, on-the-ground level, they are less valuable for making larger-scale plans and tracking evolving priorities. A GitHub Project acts as an umbrella that includes many issues and tracks their inter-relationships within a bigger-picture view of a project.
This lesson is just a quick introduction to GitHub Projects, showing a few key features and management tips. As you work with collaborators within a project, you can develop your own style and approach to using Projects, and you can also explore the GitHub documentation for more details and tips.
For many research collaborations and working groups, using issues and issue metadata can be enough for the scale of their project. GitHub Projects can be super useful, but they also include a non-trivial amount of setup and maintenance. Consider using a GitHub Project if some of the following applies to you:
- You create and manage issues extensively
- You apply many metadata features within issues, E.g., assignees, labels, sub-issues, issue relationships
- You work across multiple repositories, all with their own issues
- Project management is interesting or exciting to you! 🤓
4.1 Creating a Project
You can create a project from your GitHub user profile page, an organization page, or from a repository page on which you are owner or have appropriate permissions. In any case, click on the Projects tab, then click the + New project button.


The project owner is the user or organization under which the project is created. This determines who has access to the project and where it lives within GitHub.
A project does not belong to a particular repository, and a project can pull issues and info from multiple repositories even across multiple owners!
4.2 Project Views and Templates
When you create a project, you can choose from several pre-defined templates: Team planning, Kanban, Feature release, Bug tracker. These templates provide a starting point with pre-defined metadata, automation, and views, but you can customize them as much as you like.

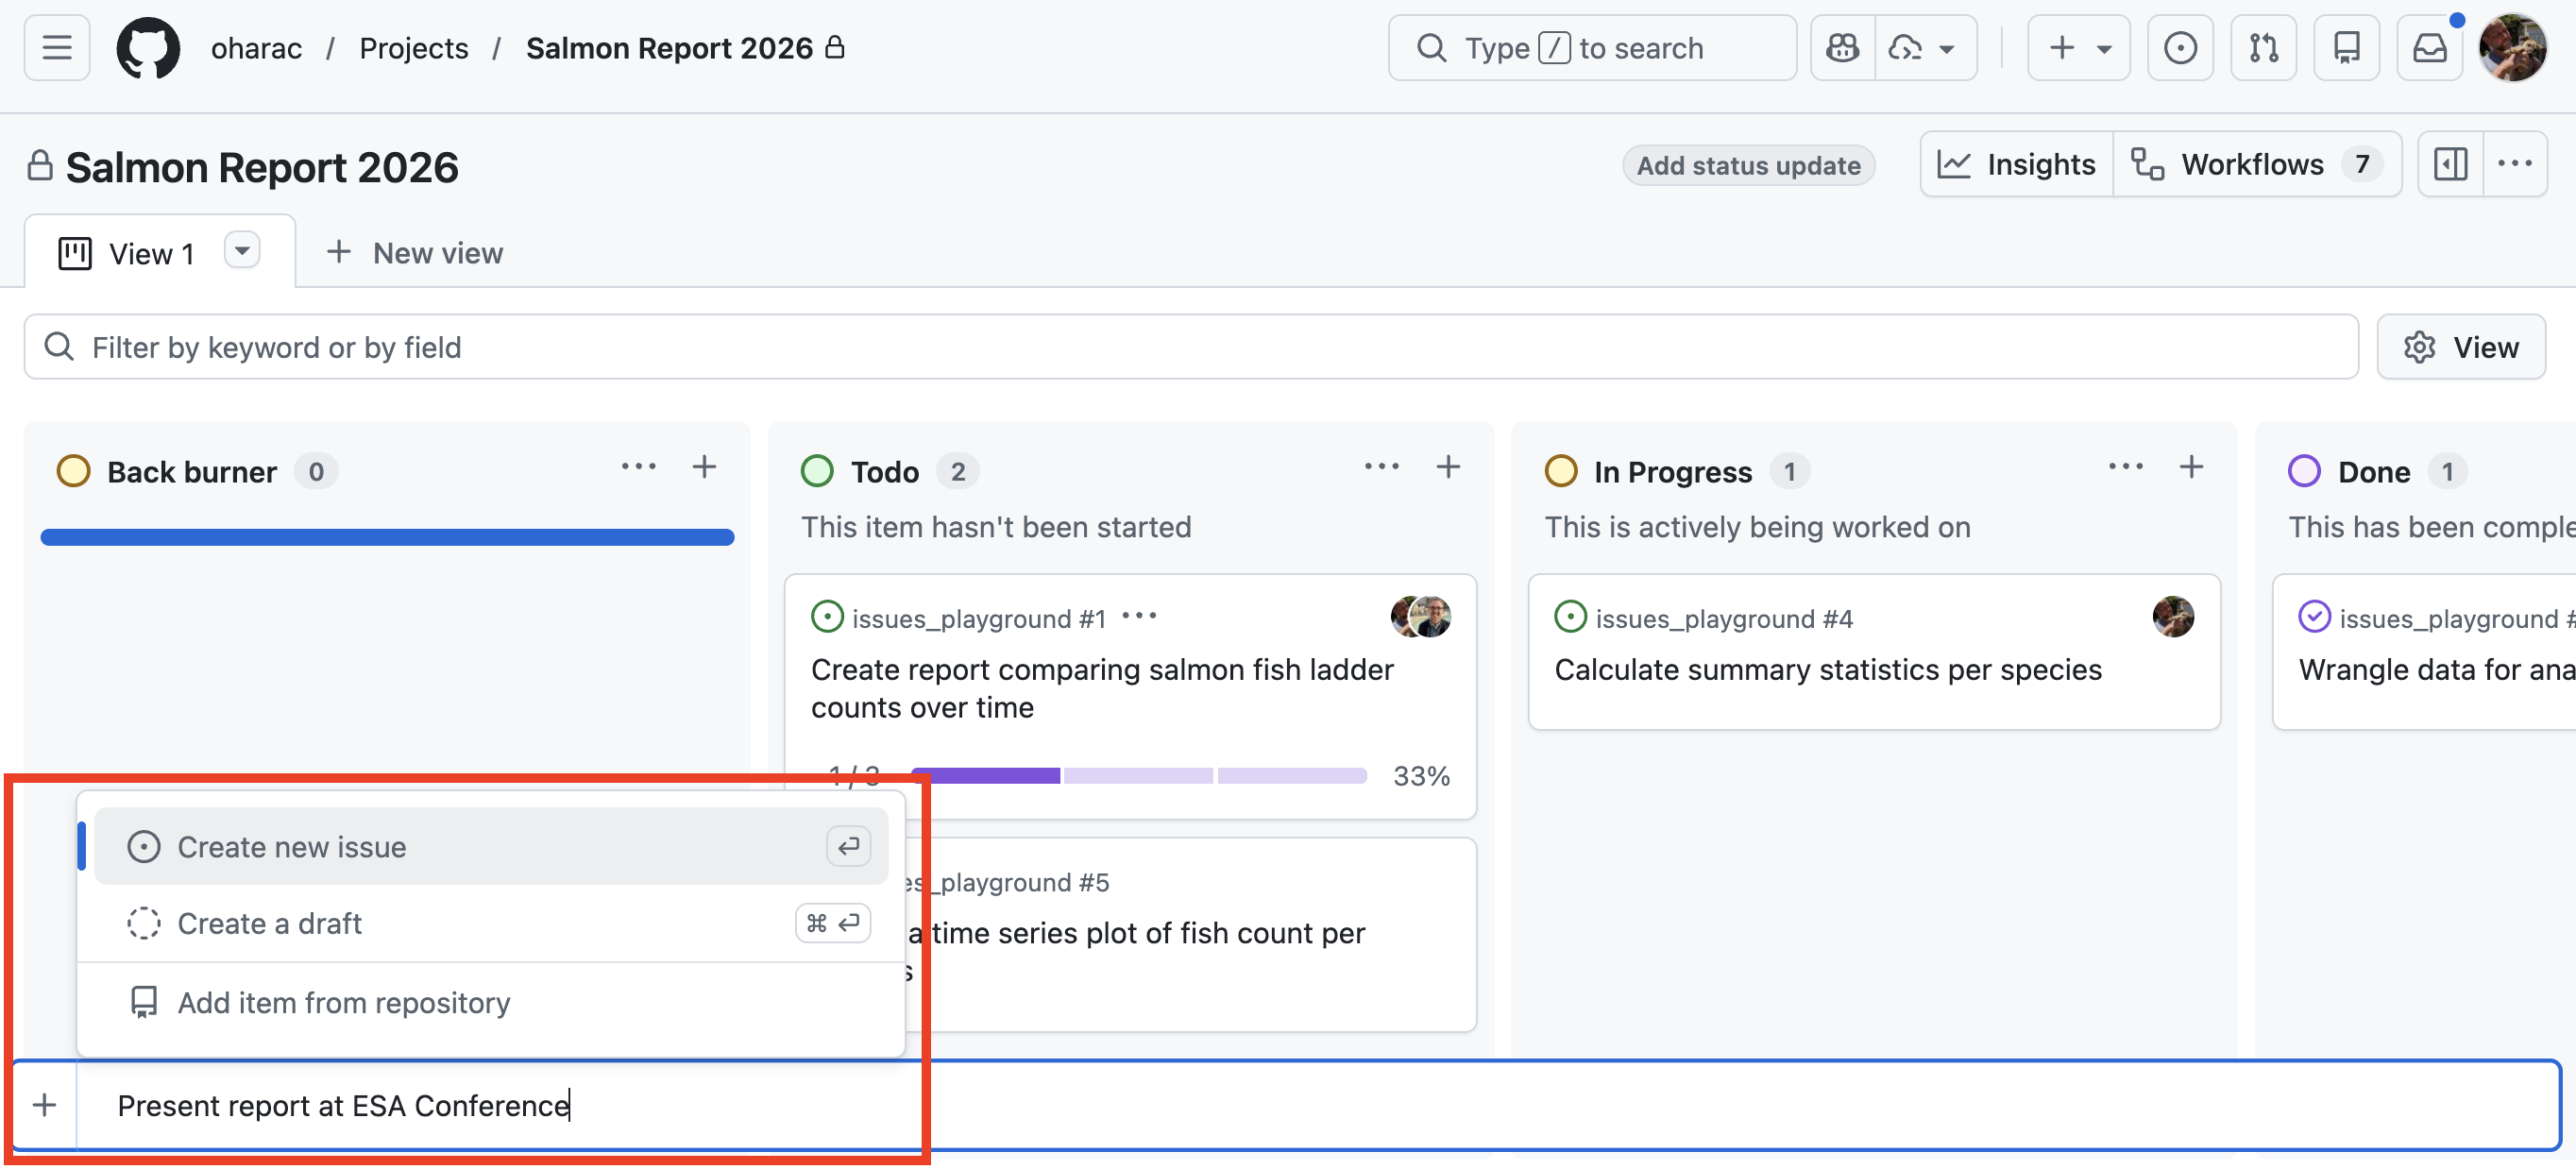
For your first project, it might be less intimidating to “start from scratch” by choosing a simple view. Here we have chosen a new “board” view, which is a flexible, visual, intuitive way to organize and track issues.
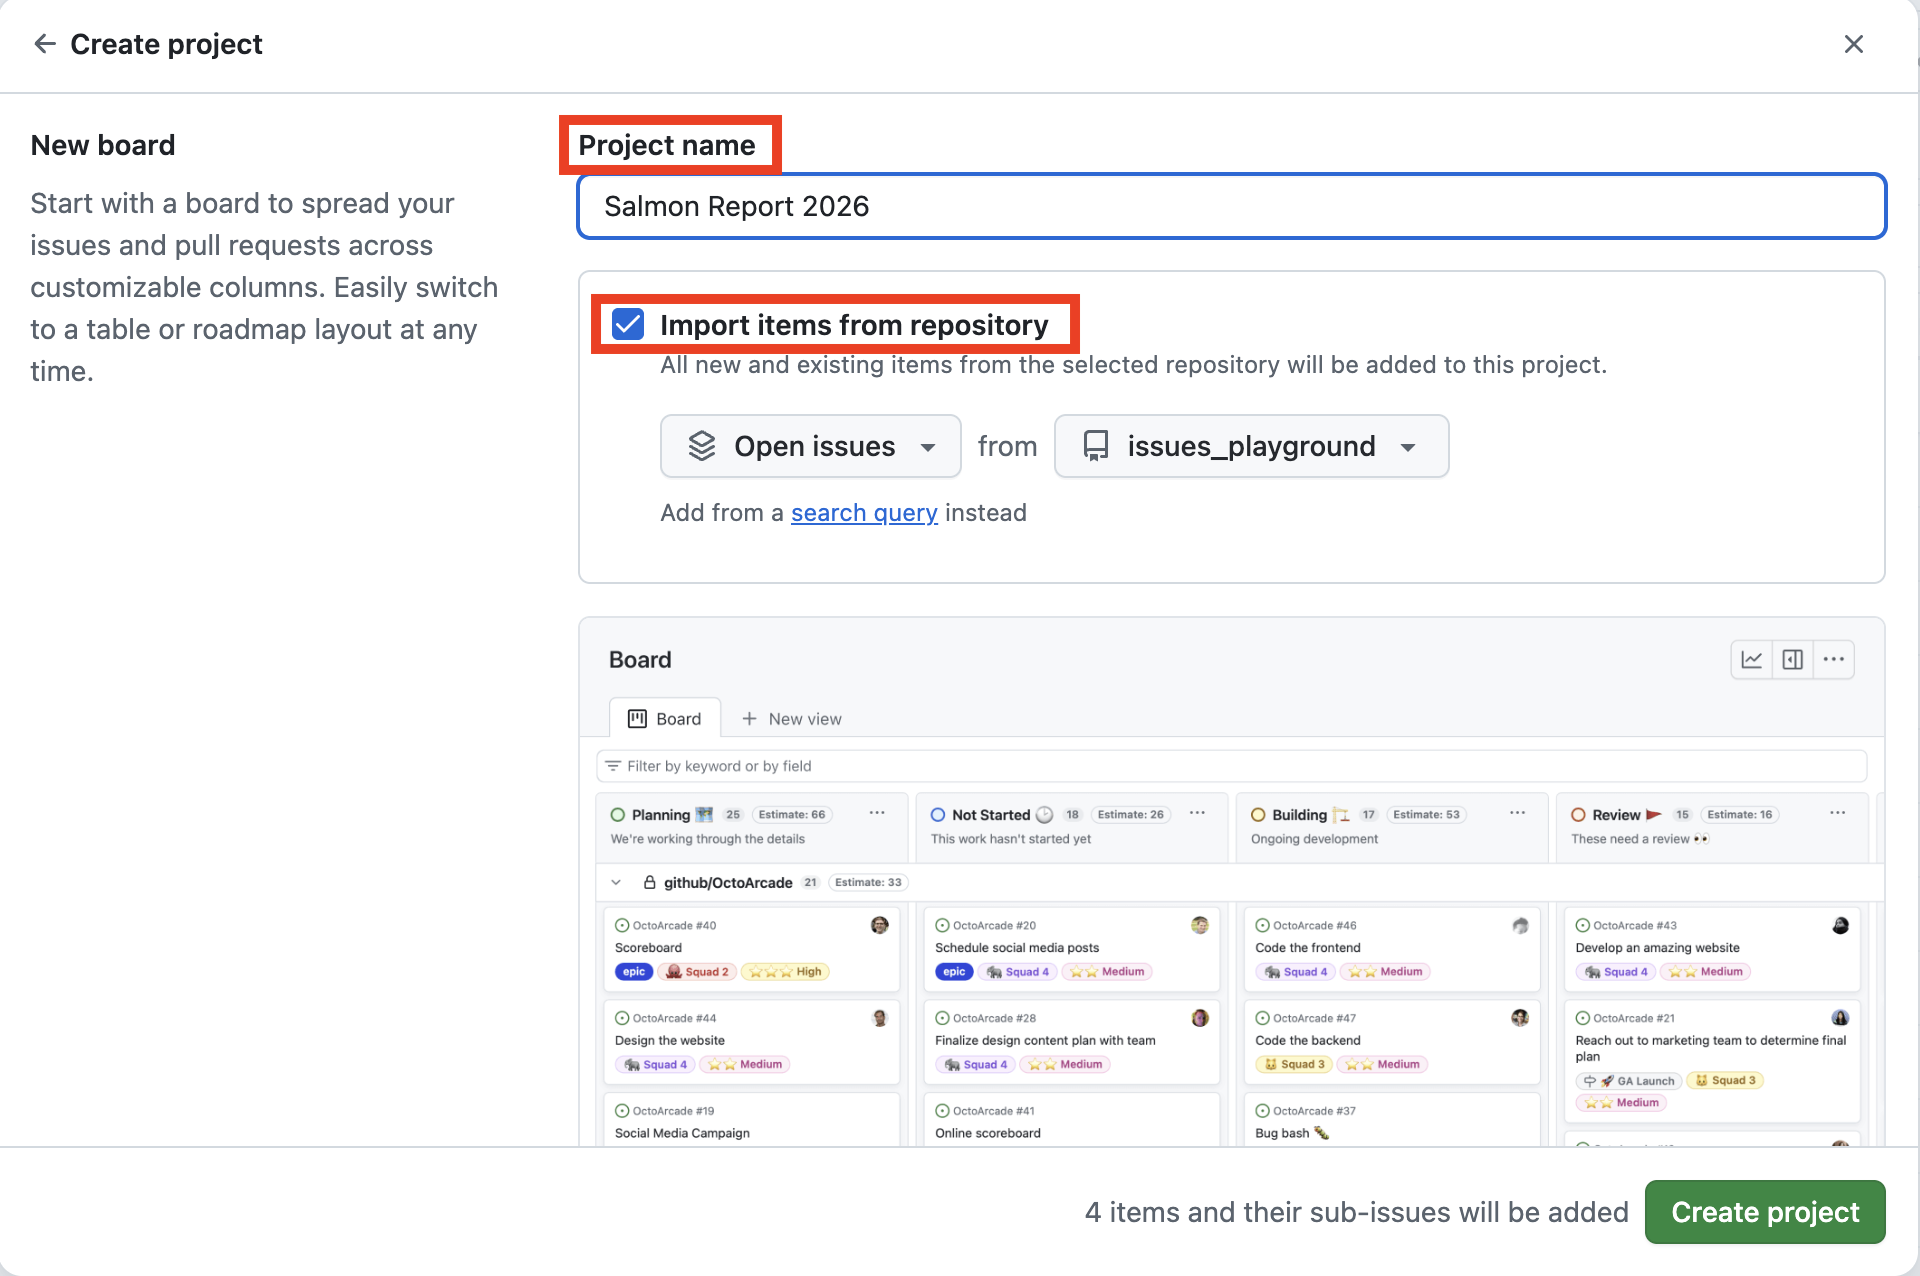
Here you can name the project and optionally choose to import issues from an existing repository! Thanks GitHub!
You can add multiple Views to a project, each organizing and visualizing the project’s issues in a different way.
- Table view: a spreadsheet-like interface to view and edit issue metadata in bulk.
- Board view (e.g., Kanban board): a visual, intuitive, drag-and-drop interface to organize issues into columns that represent different stages of completion, categories, or any other grouping that makes sense for your project.
- Roadmap view (e.g., Gantt chart): a chronological view of all activity on the project’s issues, including comments. Requires a bit more information than the Board view (e.g., start/stop dates, dependencies), but provides a powerful way to track the timeline and dependencies of a project.
4.3 Managing a Project
Just as you can customize metadata for issues, you can manage and customize many options for a project. In board view, you can add new columns, rename columns, and drag and drop issues between columns. You can also customize the metadata that is displayed on the cards, and you can filter the view to show only certain issues based on their metadata.
Add a new issue to that column (click + in top right of that column), something like “Present report at ESA Conference”. This shows up at the bottom of the browser window. Select the option to create this as a new issue (click the + next to the issue title if necessary). (You can also create as a draft that can later be converted to a full issue, or link to an existing issue.)
 )
)